Monday, April 29, 2013

Wet n Wild MegaLast Liquid Lip Color

I totally admit it. I did not NEED another lip product. But the colors got me. And the price. These were $2.99 and on sale at Walgreens so I got 2 for $3.50.


I grabbed Back to the Fuchsia and Click on my HyperPink because I was intrigued by the super opaque colors and the promise of a MegaLast lipgloss. The thing is...these are not glosses.

I mistakenly applied the first one like a lipgloss. Took the doefoot applicator and just went at it, slicking on a couple layers right off the bat.

This is seriously one swipe of the wand...OPAQUE

And then I was like "Oh what kind of fresh hell is this??!!". Instant clumpy, dry, sticky, splotchy, ooey gooey grossness.

NOT GOOD. And it stains. So even after I was finally able to chisel this stuff off my lips, they were bright freaking pink and pissed off.

I didn't want it go to waste, so I started reading some other reviews and most people said to put a balm on first, apply a teeny tiny layer and leave it alone.

The way I was able to make this stuff work was similar. I applied a little lip balm, then took a tiny amount of the Liquid Lip color and dabbed it on with my finger so it was more of a stain look than a straight opaque lip color. I topped with a gloss and finally liked the look (and feel) of this product. I would not apply with the applicator included because there is no possible way to get an even application. You can't keep reapplying to get it even or else it never dries and just clumps and looks awful.

It does stay for ages and the colors are seriously intense. It just takes a little bit of coddling to get a good result. Not my favorite thing due to my general lazy approach to lips. I like something I can just slick on and call it good. This takes patience.

I will keep these and will definitely use these for events where I need my lips to stay bright and punchy for hours. But not an everyday lip product for me.

Have you tried these? Any tricks to make them work for you?

Wednesday, April 24, 2013

DIY Super Blonde Using Drugstore Products

If you follow my twitter you know I've been on a mission for super blonde hair for about 2 weeks. I've been going slow so as not to fry my hair and I would not recommend that you do this in a 2 week span because it was not awesome for my hair. Buuuutttt...I got the color I wanted at home for about $30. So, that's a win in my book. As always, I'm not a professional. OBVIOUSLY. This is just what worked for my hair to get it the color I wanted.

I have never been this blonde. I've never done an all over blonde before, just highlights which can only get you so far. I just decided to be brave and try something new, which is hard for me. Mostly because I am impatient and I hated the idea of walking around with hair I didn't love while going through the process. But I did it and I think it was worth it for me!

ROOTS!!!! The horror.
 
I started with DIY highlighted hair with about 2 inch roots. I decided that I wanted to lift the base and then highlight to get it all over blonder without going platinum. I still wanted some highlights. So, basically I bleached my roots out with powder bleach and 30 vol on the scalp developer, washed, dried and then covered my whole hair with an all over high lift blonde (ION High Lift Ash Blonde) to get a uniform base. I then toned it all and left it alone for about a week to calm down. It was definitely blonder, but not a pretty blonde in my opinion. Kind of a dingy blonde. Which was fine, it was just the base color.


After All Over Color and Toning
Way blonder, but blah...
 
I used 2 boxes of the High Lift Ash Blonde with 40 vol developer all over my hair, processed about 45 minutes
1 box of T18 (formerly White Lady) Wella Toner with 20 vol developer, left on about 8 minutes
 

I then went back in and had to highlight twice. First, I used Revlon Frost n Glow and it looked like this. Good, but not quite there yet. It was still a little too brassy for my liking.


I was going to use the same kit the second time but the store I went to was out of it so I tried a different kit, which I kind of fell head over heels in love with. I have never used this kit before and am kind of kicking myself over not trying it. It's the L'Oreal Frost and Design kit in Champagne. It's about $4 more than the Revlon kit but it has a lot more products in the kit. It contains a lot more bleach (I have to buy 2 Revlon kits for the length of my hair and 1 L'Oreal kit did my whole head with leftover product). It also has a protectant cream that goes in the bleach which makes it this almost creamy whipped texture that is super easy to work with. It has a toning rinse included which I think is just genius. It left my hair feeling soft and not fried and also a perfect shade of blonde. I will definitely be switching to this kit from now on.


Holy Grail Drugstore Highlighting Kit. For real.

Anywhoo, after several different processes I basically went from dishwater blonde with highlights to all over blonde with platinum and honey strands mixed in. I couldn't be happier with the results! I am trying to minimize heat tools for a while to let it recover from this crazy blonde ambition, so please excuse the boring, straight hair. But you can see the color results pretty clearly. Love, love, love!


Tuesday, April 23, 2013

Prom Hair and Makeup


This year my super gorgeous cousin Allison went to her first prom. I was so excited when she asked me to do her hair and makeup for it. I don't actually remember if she asked or if I insisted...either way :) We've done hair/makeup for homecoming, but prom is a major deal and so much more exciting.

Her dress was this gorgeous, poppy pinkish red hue that just looked stunning on her. Because it had one shoulder of rosettes, we decided to do her hair all to one side. She chose a voluminous side swept style and I think she chose the perfect hair to compliment her dress.

This was the inspiration picture she chose. I think we got pretty close, with a few little changes because her hair isn't as long as the picture.


I started on her dry hair. I split the hair in sections by layer and sprayed each section with heat protectant. I then curled the hair with my flat iron  and curled it in different directions so it wouldn't clump together. I think curling in different directions was the most vital step to this look. It really gave her hair more volume and kept it big. Which is what she wanted.

Once I got about 1/2 way up her head, I started slightly backcombing each section before curling to give it a little more "oomph" since she wanted volume.

When we reached the crown section, I used Backcomb in a Bottle by Big Sexy Hair. I sprayed at the roots and then slightly backcombed that as well for extra volume. I flat iron curled all of those sections and allowed it all to cool in clips.

Once it was cooled, I started pinning the bottom section. She didn't want a "ponytail" look, more side swept. So I just very loosely (don't pull) started pinning pieces to the side while working with the curl. As I worked my way up I tried to pin on top of the already pinned pieces to create more of a cascading look instead of an updo.

I finished by taking my backcomb tail, inserting it on the crown section and lightly pulling up to get the top to loosen. This created the final bit of volume at her crown. I then placed 3 rhinestoned pins in the twist section of the hair and sprayed the ever loving hell out her hair.


Now on to makeup.


Because her dress was such an extraordinary shade, we didn't want to try to match or go bright with the lips. So, a traditional smokey eye seemed like a good choice for some drama. This girl has crazy long eyelashes so we didn't have to use fake eyelashes. 
 
I think the combination of a smokey eye with a lighter lip kept her look youthful and fresh but still dramatic and special enough for prom. I used the following products for her makeup look:
 
Face:
Revlon ColorStay Foundation
Rimmel Stay Matte Powder
Rimmel Match Perfection Highlighting Concealer
NYC Sunny Bronzer
Revlon Coral Reef Cream Blush
Wet n Wild Reserve Your Cabana Highlighter


Eyes:
Maybelline Color Tattoo in Barely Branded and Bad to the Bronze
Urban Decay Naked Palette (Sin, Virgin, Halfbaked, Smog, Toasted, Hustle and Creep)
CoverGirl 24 Hour LashBlast Mascara on top lashes only
Sephora Flashy Eyeliner in Ultra Brown on ower lashes and waterline
L'Oreal Carbon Black Lineur Intense liquid eyeliner

Lips:
Bonne Bell Lip Lites Strawberry Parfait

Overall, I was so pleased with how it all came out and was so lucky to be able to be a part of Ali's special day. She's a gorgeous girl who I love so very much and I can't wait to do it again next year!!

Friday, April 19, 2013

Maybelline Color Sensational Vivids "Vivid Rose" Lipstick

Vivid is RIGHT.

Wowza. This is the brightest lipstick I've ever owned. I saw it at Target and just couldn't leave the store without it.


This Vivid Rose color is just vibrant, saturated and gorgeous. It's a very vivid reddish pink (?), pinky red (?), bright rose shade.


The thing I like the best about this lipstick is that it's not glossy or shiny. I feel like when you are wearing a super bright lipstick shade, if it is also glossy it can look kind of cheap. Something about a more matte finish makes it feel more modern.

I wouldn't say this is straight up matte, but it does have a more matte-like finish. Velvet maybe? I don't typically like matte's on my lips, they feel very dry. This doesn't. It almost feels like it lasts longer because it's not super glossy.


I love love love this color and will definitely be looking at more shades in the Vivid's collection.

Tuesday, April 16, 2013

Drugstore Highlighter-Wet n Wild "Reserve Your Cabana"

Pretty much forever I have been searching for a drugstore powder highlighter that I liked. I have been using a Pixi one that I've had FOREVER but it is a little too peachy. Still gorgeous, just not exactly what I've been looking for.

I have seen EmilyNoel talk about Wet n Wild "Reserve Your Cabana" and have not been able to find it in any of our stores. We don't have an Ulta nearby either, shame.

However, a few weeks ago I was looking at the makeup aisle in Walgreens...as you do...and ta-da! There she was. In all of her $3 glory.

Suffice it to say, she was mine in an instant.

Can I just say how HUGE this is? It is literally bigger than my palm.

Technically it is sold as a "bronzer". I'm not sure who this would bronze as it is literally cream colored. It is definitely a highlighter, with it's cream color and slightly shimmery/sheen finish. It makes your face glow in a gorgeous way.


I like to use this on top of my cheekbones, down the nose and the cupids bow. I've even used it on minimal makeup days for my brow and inner corner highlight and it's worked beautifully.

The only...ONLY...thing that I don't completely love about this is that it is slightly powdery. As in, if you put your brush in, even lightly, you will have fall out. So make sure you tap any excess off before going to your face.

Other than that, this is a STEAL and once it runs out, if it ever runs out, this is something that will be a permanent addition to the makeup collection!


Monday, April 8, 2013

Girls Night Out

 
This past weekend a bunch of us girls went out to celebrate the upcoming wedding of one of my girlfriends. I was feeling daring and decided to do a gold and black smokey eye.


I don't usually like a black smokey eye. If I do one, it's typically a bronzey one as I just find it to be more wearable on me and not "too much". But, if you can't do a fun eye look with your girlfriends, when can you really? I used the black more toward the outer corners of my eye to keep it looking open and not too raccoony.


I didn't use false lashes, but you definitely could if you wanted to amp the look up.

For this look I'm wearing:

Face:
L'Oreal True Match Foundation mixed with Clinique Even Better
MAC Mineralized Skin Finish Natural powder
Revlon PhotoReady Concealer
NYC Bronzer in Sunny
Revlon PhotoReady blush in Coral Reef

Lips:
Revlon Just Bitten Kissable Balm Stain in Precious

Eyes:
Maybelline Color Tattoo in Barely Branded as a primer
Urban Decay Naked Palette:
1. Virgin on Inner corners and browbone
2. Half Baked on the middle of the eyelid and bottom lash line
3. Smog on outer 1/3 of eyelid
4. Hustle on outer V
5. Creep to intensify outer V
6. Naked to blend and on eyebrows
Maybelline black gel eyeliner on top and bottom lashes and also tightlined
Maybelline black The Falsies mascara on upper lashes
Maybelline black The Rocket mascara on bottom lashes

My hair was done using a 1 inch Hot Tools flat iron.

Thursday, April 4, 2013

March Favorites

Finally. Does anyone else think March was like the longest month ever? Maybe it's because we had Spring Break in the middle or something. It just seems like it's been March for-EVER.

On that note...here are the products I used and loved during the long ass month of March :) It's a lot of Clinique for some reason too.

I am wearing 4 out of my 5 favorite things in this look! Foundations, Eyeshadow Trio, Blush and Lipgloss.


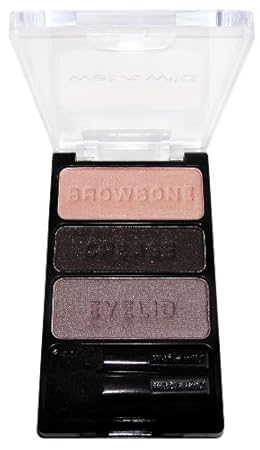
1. Wet N Wild "Silent Treatment" palette. I've been wearing this pretty much all month long. I can wear this 2 different ways, with the medium shade over my lid with the pink shade as a highlight or I use the pink shade on my browbone and eyelid and use the medium shade as a crease color (see above photo). It's soft but looks polished either way. These are very pigmented so you don't need a lot of color and they last all day. For under $3 this is a must have palette for me.


2. I've been mixing 2 foundations this month to get a look I am loving. I like both on their own but neither is the right shade for me right now. I am mixing L'Oreal True Match in N2 and Clinique Even Better in Neutral. I mix equal parts on the back of my hand and apply with my MAC foundation brush. The result is a perfectly glowy face. Love love love.

3. Estee Lauder Pure Color High Gloss Ultra Brilliance Lipgloss in Flash Dance.  I love Flash Dance because it looks like a super bright pink in the tube but turns into this flattering shade on the lips. It just instantly perks my face up. Also, Estee Lauder has some of the best scented lip glosses I've ever tried. The consistency is perfect as well. Not too sticky, just perfectly glossy.


4. Clinique "Happy" perfume. I have used this since high school. I really only ever use it around springtime because it is just SO springy. Something about it always takes me back to springtime. It's so fresh, girlie and literally "happy". I have been wearing this pretty much nonstop all month.


5. Clinique Blush in "Cupid". It's been on the favorite list before and for a good reason. One swish of this blush lights up your whole face. It's a universally flattering pink, perfect for spring and just gives that sweet pop of pink we all love! I have gone through 2 of these blushes and will definitely keep purchasing it. It is a fantastic blush!